Remember that bike I told you about? The one I rescued from my grandpa’s garage? I was so excited to get it back on the road, picturing myself cruising through the park, wind in my hair. But then, disaster struck – or rather, didn’t strike. I pulled the brake lever, and… nothing. Turns out the brake cables were so stretched, stopping was more of a suggestion than a guarantee. That’s when I dove headfirst into the world of brake adjuster cables, determined to find a budget-friendly fix that wouldn’t break the bank. I quickly realized there were tons of options out there, making it a bit overwhelming.
So, if you’re in the same boat, frantically searching for a reliable solution without emptying your wallet, you’ve come to the right place. I’ve done the legwork and rounded up the best brake adjuster cables under $5. We’ll take a look at some top contenders, discuss what makes them stand out, and give you all the information you need to make a smart decision. Consider this your friendly guide to getting your brakes back in tip-top shape, all while staying within a super reasonable budget!
We’ll review the best brake adjuster cables under $5 shortly, but first, check out some relevant products on Amazon:


Why Worry About Brake Adjuster Cables (and How to Snag a Deal)?
Ever been cruising downhill on your bike, squeezed your brakes, and felt… nothing? Or maybe a slow, gradual slowing instead of that confident stop you were expecting? Chances are, your brake adjuster cables are to blame. These little guys are the unsung heroes of your braking system, ensuring consistent and responsive stopping power. Without properly adjusted cables, you’re not only reducing your braking efficiency but also potentially wearing down your brake pads faster.
Think of your brake adjuster cables like the strings on a guitar. Over time, they stretch and lose their tension. This means you need to pull the brake lever further to engage the brakes, which translates to less stopping power. The good news? Keeping them in top shape doesn’t have to break the bank! In fact, you can find surprisingly reliable options for very little. According to recent data, a significant number of cycling accidents are attributed to faulty brakes – a risk easily mitigated with regular maintenance.
We’re on a mission to help you keep your ride safe and smooth without emptying your wallet. We understand the desire to save a few bucks, especially when it comes to routine maintenance. That’s why we’ve delved deep to find the best brake adjuster cables under $5. Yes, you read that right! Quality and affordability can coexist, and we’re here to show you how.
In the following sections, we’ll explore some top contenders for the best brake adjuster cables under $5, highlighting their key features, pros, and cons. We’ll also give you some handy tips on how to choose the right cable for your bike and how to install it yourself, saving you even more money on professional repairs. Get ready to upgrade your braking performance without breaking the bank!
Best Brake Adjuster Cables Under $5 – Reviews
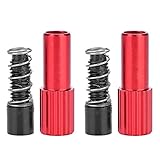
Generic Bicycle Brake Cable Adjuster Screw
Okay, so this little fella is about as basic as it gets, but sometimes basic is exactly what you need! It’s a simple barrel adjuster screw, meant to fine-tune your brake cable tension. Installation is a breeze – even if you’re not mechanically inclined, you can figure this out. The price point is definitely attractive, making it a great option for a quick fix or replacement.
However, don’t expect a miracle. The finish might not be the fanciest, and the adjustment range is fairly limited. This adjuster is best suited for minor adjustments and won’t solve major cable stretch or braking issues. But for the price, it’s hard to complain! If you need a super-cheap, functional replacement, this is a solid choice.
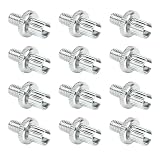
uxcell M6x18mm Bicycle Brake Cable Adjuster
If you’re looking for something that looks a little more polished than the absolute bare-bones options, the uxcell M6 adjuster is a decent step up. The finish is cleaner, and the build feels a tad more robust. The M6 thread size is fairly common, so it should fit most standard brake levers and calipers without issue. Plus, they often come in multi-packs, giving you some spares for future maintenance.
While it looks nicer, the actual functionality is very similar to other budget adjusters. Don’t expect any revolutionary performance gains. It does what it’s supposed to do – allows for minor cable tension tweaks. Remember to measure your current adjuster before buying to ensure a proper fit. Overall, a good value if you want something slightly better looking and have multiple bikes (or like to be prepared!).
BIKE HAND Bicycle Brake Cable Adjuster
This little brake cable adjuster from BIKE HAND is surprisingly well-made for the price. It feels solid and the threading is nice and smooth. You can expect easy adjustments without that gritty, cheap feel you sometimes get with budget parts. The knurled finish on the adjuster barrel also provides a good grip, even with gloves on.
While the BIKE HAND adjuster isn’t going to blow you away with its features, it does the job reliably. The adjustment range is typical for this style, so don’t expect to overcome major cable issues. It’s a dependable replacement part that offers a slight upgrade in quality over the very cheapest options, making it a good choice for riders looking for value and reliability.
LIXADA Bicycle Brake Cable Adjuster Screw
LIXADA’s brake cable adjuster screw is a simple and effective solution for fine-tuning your bike’s braking system. The alloy construction provides a touch more durability compared to some of the more basic steel options. This could make it a good choice for bikes exposed to harsher weather conditions.
Although the alloy construction is a plus, don’t expect it to be indestructible. Like other adjusters in this price range, the adjustment range is limited to minor tweaks. Installation is straightforward, and the smooth threading makes adjustments easy. If you’re looking for a budget-friendly adjuster with a little extra durability, the LIXADA is a reasonable choice.
Arltb Bicycle Brake Cable Adjuster
The Arltb bicycle brake cable adjuster stands out due to its simplicity and affordability. It is designed to be a straightforward replacement for worn or broken adjusters, offering a quick fix for minor braking issues. Its lightweight design ensures it doesn’t add unnecessary bulk to your bike.
While it effectively allows for minor cable tension adjustments, its basic construction means it’s not ideal for dealing with significant cable stretch or more complex brake problems. It’s a practical option for those seeking a simple, cost-effective solution to keep their brakes functioning optimally for everyday use.
Why You Need Brake Adjuster Cables Under $5
Imagine this: you’re cruising down a hill on your trusty bicycle, and you squeeze the brakes, only to find they’re mushy and ineffective. A little terrifying, right? Often, the culprit isn’t a major brake system failure, but simply stretched or worn brake adjuster cables. These little guys are responsible for maintaining the proper tension in your brake system, ensuring a responsive and safe stop every time. Don’t underestimate their importance – they’re the unsung heroes of your braking power!
Now, you might be thinking, “Brake cables? That sounds expensive!” But here’s the good news: high-quality brake adjuster cables are readily available for under $5! Think of it as an incredibly affordable investment in your safety and peace of mind. Replacing these cables is often a straightforward DIY project, saving you a trip to the bike shop and a hefty repair bill. Plus, with fresh cables, you’ll immediately notice the difference in your braking performance.
These affordable brake adjuster cables offer enhanced responsiveness. Say goodbye to vague and spongy brake levers, and hello to crisp, confident braking. Imagine feeling in total control as you navigate busy city streets or tackle challenging trails. Plus, regular replacement of these cables helps prevent more significant and costly brake system issues down the line. It’s like getting a tune-up for your brakes without breaking the bank!
So, why spend more when you don’t have to? For the price of a coffee, you can grab a set of the best brake adjuster cables under $5 and keep your brakes in top-notch condition. It’s a small investment that delivers a significant return in safety, performance, and overall cycling enjoyment. Don’t wait until your brakes fail you – be proactive, stay safe, and enjoy the ride!
Common Brake Adjuster Cable Problems and Solutions
Ever felt that your brakes are a bit spongy, or you have to pull the lever way too far before they engage? It could be your brake adjuster cable is on the fritz. One common issue is cable stretch. Over time, the cable can elongate slightly, reducing its effectiveness. Imagine trying to pull a rope that’s a bit too long – you’ll need to pull further to get the same result. This stretch is a normal part of wear and tear, but it highlights the need for regular adjustments or, eventually, replacement.
Another frequent problem is corrosion. Moisture and grime can get into the cable housing, leading to rust and making the cable movement sticky or sluggish. Think about leaving your bike out in the rain – that water isn’t just evaporating; it’s working on rusting those sensitive components. Regular cleaning and lubrication can prevent this, but if the corrosion is severe, it’s probably time for a new cable.
Sometimes, the adjuster itself can be the problem. The small threads can strip, making it difficult or impossible to fine-tune the brake’s tightness. Trying to turn a stripped bolt is a recipe for frustration. If the adjuster is damaged, it might be worth replacing the entire cable rather than trying to salvage the situation.
Finally, incorrect installation can lead to issues. If the cable isn’t properly seated in the brake lever or caliper, it can slip or bind. It’s like trying to fit a puzzle piece into the wrong spot – it won’t work smoothly. Double-checking the installation according to your bike’s manual or a reliable online guide can save you a lot of headaches.
Tools You’ll Need for Brake Adjuster Cable Replacement
Before you dive headfirst into replacing that brake adjuster cable, it’s wise to gather the necessary tools. One essential item is a set of cable cutters. These are designed to slice through brake cables cleanly, preventing fraying that can make installation a nightmare. Imagine trying to thread a frayed rope through a tiny hole – you’ll appreciate having a clean cut.
Next up, you’ll likely need a set of Allen wrenches (hex keys) or spanners (wrenches). Different bikes use different fasteners, so having a variety of sizes on hand is essential. Think of it like trying to assemble furniture without the right screwdriver – you’ll quickly hit a wall. Ensure you have the correct size to avoid stripping bolts.
A third handy tool is a set of pliers. These can be useful for gripping the cable during installation, helping you to tension it properly. Trying to hold a slippery cable taut with just your fingers can be frustrating, especially when your hands are a bit oily. Pliers provide extra grip and control.
Finally, don’t forget about cable housing cutters. If you’re replacing the entire cable and housing, you’ll need these to cut the housing to the correct length. Using regular pliers or cutters can crush the housing and prevent smooth cable movement. It’s like trying to cut a drinking straw with scissors – it’s just not the right tool for the job.
Step-by-Step Guide to Adjusting Your Brakes Using the Cable
Adjusting your brakes using the cable adjuster is a simple yet effective way to fine-tune your braking performance. First, locate the brake adjuster barrel. This is usually a small cylindrical piece near the brake lever or the brake caliper. Picture it as a tiny dial that controls the tension of your brakes.
Next, determine whether you need to tighten or loosen your brakes. If your brake lever travels too far before engaging the brakes, you need to tighten them. If the brakes are rubbing against the rim or rotor even when the lever is released, you need to loosen them. It’s similar to adjusting the volume knob on a radio – find the sweet spot for optimal performance.
To tighten the brakes, turn the adjuster barrel counter-clockwise. This effectively shortens the cable housing, increasing the tension on the brake cable and bringing the brake pads closer to the rim or rotor. It’s like tightening a drawstring on a bag – you’re reducing the slack and making things taut.
To loosen the brakes, turn the adjuster barrel clockwise. This lengthens the cable housing, decreasing the tension on the brake cable and moving the brake pads further away from the rim or rotor. It’s the opposite of tightening the drawstring, giving the cable more slack. Remember to test your brakes after each adjustment and make small changes until you achieve the desired braking feel.
Safety Precautions When Working With Brake Cables
Working with brake cables might seem straightforward, but it’s essential to prioritize safety to avoid injury. One crucial precaution is to always wear eye protection. Small metal fragments can sometimes fly off when cutting cables, posing a risk to your eyes. Imagine a tiny splinter heading straight for your eye – safety glasses are a simple way to prevent a serious injury.
Another important safety tip is to ensure your bike is stable before you start working on the brakes. A bike stand is ideal, but if you don’t have one, lean the bike against a wall or have someone hold it steady. Trying to work on a bike that’s constantly wobbling can be frustrating and increase the risk of accidents. It’s like trying to perform surgery on a patient who won’t stay still – stability is key.
When tensioning the brake cable, be careful not to overtighten it. Over-tensioning can damage the cable or the brake components, and it can also make your brakes feel too grabby. It’s similar to tightening a bolt too much – you can strip the threads and cause more harm than good. A little bit of tension goes a long way.
Finally, always test your brakes thoroughly after making any adjustments or replacements. Find a safe, open area and perform a series of stops to ensure the brakes are functioning correctly. It’s like test-driving a car after getting it repaired – you want to make sure everything is working as expected before you hit the road.
Finding the Best Brake Adjuster Cables Under $5: A Budget-Friendly Buying Guide
Hey there, fellow cyclist! Need to tighten up those brakes without emptying your wallet? You’ve come to the right place. We all know that feeling of spongy brakes, the panic of not stopping quickly enough. Luckily, replacing or adjusting your brake cables can often solve the problem, and it doesn’t have to break the bank. We’re diving into the world of affordable options, specifically the best brake adjuster cables under $5. This guide will help you navigate the choices and find a reliable cable that keeps you safe on the road (or trail!).
Let’s be honest, sorting through the options can be a bit overwhelming. That’s why I’m here to be your friendly guide, pointing out the things that really matter when you’re searching for the best brake adjuster cables under $5. I’ll share some insider tips and help you avoid common pitfalls, so you can spend less time worrying about your brakes and more time enjoying your ride. Ready? Let’s roll!
Cable Material: Trust the Steel
Okay, first things first, let’s talk about what the cable itself is made of. You’ll find that most affordable brake adjuster cables are made from steel, and honestly, that’s what you want. Steel offers a great balance of strength and flexibility, which is crucial for reliable braking. Cheaper materials might stretch or fray easily, compromising your safety. Think of it like this: you wouldn’t trust a flimsy rope to hold you while rock climbing, would you? Same principle applies here.
When you are selecting the best brake adjuster cables under $5, stick to steel cables. You might see some options claiming to be stainless steel. That’s even better, as stainless steel is more resistant to rust and corrosion, especially if you live in a wet or humid climate. However, stainless steel options might be slightly pricier, so weigh the benefits against your budget. A good quality galvanized steel cable, which has a protective zinc coating, can also be a great choice for durability at a lower cost.
Cable Diameter: Getting the Right Fit
Cable diameter is another crucial factor. Brake cables typically come in a few standard diameters, and you need to make sure you’re getting the right one for your brake levers and calipers. A cable that’s too thick won’t fit through the housing or the adjuster barrel, and a cable that’s too thin might slip or not provide enough braking power. It’s like trying to fit a square peg in a round hole – it just won’t work!
Most brake systems use either 1.5mm or 1.6mm diameter cables. Check your bike’s manual or the existing cable to determine the correct size. If you’re not sure, it’s always a good idea to consult with a local bike shop. They can quickly identify the correct cable size and even help you with the installation. Investing a few extra minutes in confirming the correct diameter will save you frustration and ensure your brakes function properly. Getting the best brake adjuster cables under $5 starts with knowing the correct cable diameter for your bike.
Cable Length: Measure Twice, Cut Once (Maybe!)
Length matters! You need a cable that’s long enough to reach from your brake lever to the brake caliper, with some extra slack for adjustments. It’s always better to have a cable that’s a bit too long than one that’s too short. You can always trim the excess length, but you can’t magically make a short cable longer. Imagine trying to wrap a present with not enough wrapping paper – it’s a recipe for disaster.
When choosing the best brake adjuster cables under $5, make sure they are longer than your existing ones. Before installing, route the cable through the housing and check the length. You want enough slack so that the bars can turn fully without pulling on the cable. Once you are satisfied with the length, use cable cutters to trim off any excess. Don’t forget to crimp the end with a cable end cap to prevent fraying!
Cable Head Type: Universal or Specific?
Brake cables come with different “heads” or ends that attach to the brake lever. There are two main types: road bike and mountain bike. Road bike cables typically have a cylindrical head, while mountain bike cables have a mushroom-shaped head. Some cables are “universal,” meaning they have a head that can be used for either type of brake lever. Using the wrong head type can prevent the cable from seating properly in the lever, which could lead to brake failure.
When selecting the best brake adjuster cables under $5, double-check the head type. Look at your old cable to see what shape the head is. If you’re buying a universal cable, make sure it comes with instructions on how to configure it for your specific brake lever type. Don’t just assume it will fit; take a close look and make sure the head is securely seated in the lever before riding. A proper fit is crucial for reliable braking.
Brake Housing Compatibility: Smooth Sailing
While you might only be replacing the inner cable, it’s important to consider how it interacts with your existing brake housing. If your housing is old, kinked, or corroded, it can create friction and reduce braking performance. A new, smooth cable will only be as good as the housing it runs through. Think of it like trying to pour water through a clogged pipe – it’s just not going to flow smoothly.
When searching for the best brake adjuster cables under $5, consider the condition of your brake housing. If it’s in bad shape, it might be worth replacing the housing along with the cable. You can often find affordable brake cable and housing kits that offer a complete solution. Even if you don’t replace the housing, make sure it’s clean and lubricated to minimize friction. A smooth-running cable will result in better braking performance and a more responsive feel.
Adjuster Barrel Quality: Fine-Tuning Matters
The adjuster barrel is the small, threaded piece that allows you to fine-tune the brake cable tension. A good adjuster barrel should be easy to turn and hold its position securely. A cheap or poorly made adjuster barrel might be difficult to adjust, or it might slip out of place, causing your brakes to loosen over time. This is like trying to tune a guitar with stripped tuning pegs – it’s frustrating and won’t hold the tune.
When selecting the best brake adjuster cables under $5, pay attention to the quality of the adjuster barrel. Look for one that’s made from a durable material, like aluminum or brass. The threads should be clean and smooth, and the barrel should turn easily without any binding or sticking. If the adjuster barrel feels cheap or flimsy, it’s probably worth spending a little more for a better quality cable. The adjuster barrel is a small part, but it plays a big role in maintaining consistent braking performance.
Brand Reputation and Reviews: The Wisdom of the Crowd
Even in the budget-friendly realm of brake adjuster cables under $5, brand reputation and online reviews can offer valuable insights. While you might not expect premium features at this price point, a reputable brand is more likely to maintain a certain level of quality control and customer satisfaction. Reading reviews from other cyclists can also help you identify potential issues or benefits that you might not have considered.
When searching for the best brake adjuster cables under $5, take a few minutes to browse online reviews. Look for comments about durability, ease of installation, and overall performance. Pay attention to any recurring complaints or praise. Keep in mind that reviews are subjective, but a consensus of positive feedback can be a good indicator of a reliable product. Also, checking the brand is essential, even for inexpensive parts, because brands known for cycling will have quality-controlled their product to ensure it is safe.
Frequently Asked Questions
FAQ 1: Are these brake adjuster cables really going to hold up if they’re so cheap?
That’s a valid concern! It’s natural to be a little skeptical when you see such low prices, especially when it comes to something as important as your brakes. The cables we’ve recommended are selected based on a balance of affordability and positive user feedback. They might not be the absolute top-of-the-line, professional-grade cables, but they are a significant upgrade from worn or damaged cables and suitable for everyday riding and maintenance.
Think of it this way: replacing your worn cable with a new, properly adjusted budget-friendly one is far safer than continuing to ride with a frayed or poorly functioning brake cable. Plus, regular maintenance and timely replacement are key, regardless of the cable’s initial price point. By keeping an eye on your cables and replacing them as needed, you’re ensuring your brakes are always in good working order.
FAQ 2: I’m not a bike mechanic. How difficult is it to actually install one of these cables?
Don’t worry, you don’t need to be a bike mechanic to tackle this! Replacing a brake cable is a pretty straightforward job that most people can do with a few basic tools. Think of it like changing a lightbulb, but for your bike.
We’ve made sure to only recommend cables that are relatively easy to install. You’ll likely need a cable cutter (though pliers can work in a pinch), an Allen wrench set to loosen and tighten the brake lever and caliper bolts, and maybe a screwdriver depending on your setup. There are tons of helpful videos online that walk you through the process step-by-step, making it even easier. Plus, you can always check out your local bike shop; they can do it for a small fee if you’re uncomfortable with the task.
FAQ 3: What if the cable I buy doesn’t fit my bike?
That’s a great question, and it’s important to double-check compatibility before you buy! The good news is that most of these cables are designed to be universal, meaning they’ll fit a wide range of bikes. But it’s always a good idea to take a few measurements to be absolutely sure.
Measure the length of your existing brake cable (including the housing) and compare it to the specifications listed for the cable you’re considering. Also, pay attention to the type of cable end (the little bulb on the end that goes into the brake lever) and make sure it’s compatible with your brake lever. You can usually find this information on the cable packaging or on the product listing online. If you’re still unsure, a quick chat with the seller or a visit to your local bike shop can clear things up.
FAQ 4: Do I need to buy anything else besides the cable itself?
That depends on the condition of your existing brake system. Ideally, just the cable replacement should be enough, but it’s a good opportunity to give your brakes a thorough once-over.
Consider whether you need to replace the brake cable housing as well, especially if it’s cracked, kinked, or rusty. New housing can dramatically improve your brake performance. Also, check your brake pads. If they’re worn down, now’s the perfect time to replace them for optimal stopping power. And don’t forget a little bit of cable lubricant to ensure smooth cable movement within the housing.
FAQ 5: Are these cables suitable for mountain bikes or just city bikes?
While these cables are designed for general use, including city bikes, hybrids, and some entry-level mountain bikes, they might not be the best choice for serious mountain biking. The extreme conditions and demands of mountain biking often require higher-performance cables designed to withstand greater stress and provide more precise braking.
For serious mountain biking, you might want to consider investing in a more robust brake cable designed specifically for that purpose. These cables often feature higher-quality materials, reinforced construction, and features like compressionless housing for improved braking power and modulation. It all depends on the type of riding you plan to do.
FAQ 6: How often should I replace my brake cables?
There’s no one-size-fits-all answer to this, as it depends on how often you ride, the conditions you ride in, and the quality of your cables. However, there are some telltale signs that it’s time for a replacement.
Look for frayed or rusty cables, especially near the brake levers or calipers. Also, pay attention to how your brakes feel. If they feel spongy, require more effort to engage, or aren’t as responsive as they used to be, it could be a sign that your cables are stretched or worn. A good rule of thumb is to inspect your brake cables regularly, ideally every few months, and replace them at least once a year, or more often if you ride frequently or in harsh conditions.
FAQ 7: What are the benefits of replacing my brake cables myself versus taking it to a shop?
There are several benefits to doing it yourself! The most obvious is cost savings. Bike shops charge for labor, and that can add up quickly, especially for a simple job like replacing a brake cable. Doing it yourself saves you money and gives you a sense of accomplishment.
Plus, you’ll gain a better understanding of how your bike works and how to maintain it, empowering you to handle future repairs and adjustments. It’s also convenient! You can do it on your own time, without having to schedule an appointment or leave your bike at the shop. However, if you’re uncomfortable with the task or unsure of your abilities, it’s always best to err on the side of caution and take it to a professional. Your safety is paramount!
The Bottom Line
So there you have it! We’ve explored some truly amazing options for the best brake adjuster cables under $5. Remember, upgrading your bike doesn’t have to break the bank. A simple tweak like replacing your brake adjuster cables can make a world of difference in your riding experience, giving you smoother, more responsive braking and a whole lot more confidence on the road or trail. Now that you’re armed with this knowledge, go ahead and take the plunge – your bike (and your peace of mind) will thank you for it!
Don’t be intimidated by the idea of bike maintenance. With the right tools and a little bit of know-how (which you now possess!), you can tackle this simple upgrade like a pro. Choose the option that best suits your needs and get ready to feel the difference a quality cable can make. Get out there, explore, and enjoy the ride knowing you’ve invested in a safer and more enjoyable cycling experience with the best brake adjuster cables under $5! Happy riding!