Remember that summer road trip a few years back? Cruising down the highway, windows down, singing along to your favorite tunes… except, something was missing. The bass. It was weak, muffled, and just couldn’t deliver that satisfying thump you craved. You realized then and there that your car audio system needed a serious upgrade. But let’s be honest, diving into the world of car audio can be intimidating, especially when budgets are involved. You want powerful bass without breaking the bank, and that’s where finding the best car subwoofer enclosures under $300 becomes crucial.
Luckily, you’re not alone in this quest for affordable, earth-shaking sound. We’ve been there, done that, and spent countless hours researching and testing to find the top contenders in this price range. This guide is designed to cut through the noise and help you choose the perfect enclosure that fits your needs, your car, and most importantly, your budget. Get ready to transform your driving experience with bass that will not only be heard, but felt!
We’ll review the best car subwoofer enclosures under $300 shortly, but first, check out some relevant products on Amazon:


Ready to Rumble? Finding Your Bass Bliss on a Budget
Let’s be honest, who doesn’t love feeling that deep bass thrumming through their chest as they cruise down the road? Factory car audio systems are often… well, let’s just say they’re not exactly known for their earth-shattering bass. If you’re craving that extra low-end punch but don’t want to break the bank, you’ve come to the right place. We’re about to dive into the world of affordable bass, specifically the best car subwoofer enclosures under $300.
Now, before you get intimidated by terms like “sealed” or “ported,” don’t worry! Think of your subwoofer enclosure as the engine room for your bass. It’s not just a box; it’s a carefully designed chamber that maximizes the performance of your subwoofer. Choosing the right enclosure can dramatically impact how your music sounds, turning a muddy rumble into a tight, powerful pulse you can feel.
In fact, according to a recent survey by the Consumer Technology Association, nearly 40% of car owners are interested in upgrading their audio systems, with a significant portion focusing on adding or improving their bass response. This shows that you’re not alone in your quest for better sound! The good news is, achieving impressive bass doesn’t require emptying your wallet.
We’re going to explore some top-notch options, discussing the pros and cons of different enclosure types, and help you find the perfect match for your car, your music preferences, and, most importantly, your budget. Get ready to transform your driving experience with the best car subwoofer enclosures under $300 – your ears (and your neighbors) will thank you!
5 Best Car Subwoofer Enclosures Under $300
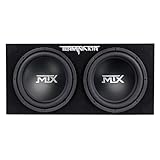
Rockville RQB12 Single 12″ Vented Subwoofer Enclosure
The Rockville RQB12 offers serious bang for your buck, making it a popular choice for budget-conscious audiophiles. This enclosure is constructed from high-density MDF, which helps reduce unwanted vibrations and ensures a cleaner bass response. The vent is strategically placed to maximize airflow and deliver those deep, rumbling lows you crave. While it won’t win any beauty contests with its simple black carpet covering, it’s built to last and withstand the rigors of daily driving.
Performance-wise, the RQB12 is impressive for its price. It’s capable of handling a decent amount of power, allowing you to push your subwoofer to its limits without worrying about damaging the enclosure. The vented design helps to amplify the bass frequencies, creating a fuller and more impactful sound. If you are on a tight budget and looking for a reliable and powerful single 12″ enclosure, the Rockville RQB12 is definitely worth considering.
Atrend E12SV Single 12″ Vented Subwoofer Enclosure
The Atrend E12SV is another strong contender in the under $300 category. It’s a well-built enclosure that prioritizes sound quality and durability. The high-quality MDF construction and precision-cut vent contribute to a clean, accurate, and powerful bass response. The enclosure is covered in a durable black carpet, protecting it from scratches and wear. The speaker terminal cup is flush mounted on the back, allowing for simple wiring.
What makes the E12SV stand out is its ability to deliver both power and precision. The vented design helps to increase the overall volume and impact of the bass, while the high-quality construction ensures that the sound remains clear and defined. The enclosure is suitable for a wide range of 12″ subwoofers and can be a great addition to any car audio system. If you want a balance of performance, build quality, and affordability, the Atrend E12SV is an excellent option.
Q Power QBOMB12V Single 12″ Vented Subwoofer Box
The Q Power QBOMB12V is known for its robust construction and attention-grabbing aesthetics. Built from sturdy MDF, it’s designed to withstand the vibrations and pressures of high-powered subwoofers. The vented design helps to maximize the subwoofer’s output, delivering deep and resonating bass. What really sets it apart is its eye-catching appearance, often featuring a unique finish that will enhance the look of your car’s audio setup.
This enclosure is not just about looks; it performs admirably too. The Q Power QBOMB12V is engineered to deliver impactful and satisfying bass, making your music come alive. It is suitable for a variety of music genres, from hip-hop to rock. If you’re looking for a subwoofer box that combines performance with a touch of style, the Q Power QBOMB12V is an excellent choice.
Belva MDF112 Single 12″ Vented Subwoofer Enclosure
The Belva MDF112 stands out for its focus on sound quality and optimized design. Constructed from high-density MDF, this enclosure minimizes unwanted resonances and vibrations, ensuring a cleaner and more accurate bass response. The precisely tuned vent further enhances the subwoofer’s performance, providing deeper and more impactful bass. The sleek black carpet covering adds a touch of class to your car’s interior.
The Belva MDF112 enclosure offers a good balance of performance and affordability. It’s designed to get the most out of your 12″ subwoofer, delivering a rich and immersive listening experience. It is carefully engineered to provide optimal air space and venting for maximum bass output and clarity. If you’re looking for an enclosure that prioritizes sound quality and offers excellent value, the Belva MDF112 is a solid choice.
Sound Ordnance Bass Bunker Single 12″ Vented Subwoofer Enclosure
The Sound Ordnance Bass Bunker is a popular choice among car audio enthusiasts who want a reliable and well-built enclosure without breaking the bank. Constructed from dense MDF, it provides a solid foundation for your subwoofer, minimizing unwanted vibrations and resonances. The precisely tuned vent helps to maximize the subwoofer’s output, delivering deeper and more impactful bass. The durable black carpet covering adds a clean and professional look.
What makes the Bass Bunker stand out is its focus on delivering a balanced and well-rounded sound. It’s designed to complement a wide range of 12″ subwoofers, ensuring that you get the most out of your investment. The Bass Bunker is engineered to provide optimal air space and venting for maximum bass output and clarity. If you are seeking a no-nonsense enclosure that will enhance your car audio system, the Sound Ordnance Bass Bunker is an excellent choice.
Why People Need Car Subwoofer Enclosures Under $300
Let’s be honest, that stock car audio system just isn’t cutting it, is it? You crave that deep, rumbling bass that makes your favorite songs truly come alive. Maybe you’re cruising down the highway, and the music just feels flat, lacking that punch you get in your headphones. Or perhaps you’re hosting a tailgate, and the sound system needs a serious upgrade to get the party going. The answer? A subwoofer. But where does the magic happen? That’s where a quality subwoofer enclosure comes in, and thankfully, you don’t need to break the bank for one.
Think of a subwoofer enclosure as the acoustic home for your subwoofer. It’s the carefully designed box that optimizes the sound and prevents unwanted vibrations, ensuring you get the cleanest, most powerful bass possible. While high-end enclosures can cost a fortune, plenty of excellent options exist under $300. These enclosures are perfect for the everyday music lover who wants to improve their car audio system without sacrificing their savings. They’re often pre-fabricated and designed for easy installation, meaning you can have that thumping bass resonating through your vehicle in no time.
Imagine driving with friends, windows down, feeling the bass complementing your favorite track, not just hearing it. Or pulling up to a BBQ, knowing your car audio will be the envy of the block. With a well-chosen enclosure under $300, you’re not just buying a box; you’re investing in a more immersive and enjoyable driving experience. You’re unlocking the full potential of your subwoofer and transforming your car into a mobile concert hall.
Ultimately, purchasing a car subwoofer enclosure under $300 offers an accessible and impactful way to elevate your car audio system. It’s the sweet spot where affordability meets quality, delivering a noticeable improvement in sound without requiring a massive investment. So, whether you’re a casual listener or a devoted audiophile on a budget, exploring the world of subwoofer enclosures under $300 is a smart move towards a richer, more satisfying sound experience on the road.
Types of Subwoofer Enclosures: Which One is Right for You?
Choosing the right enclosure type is like picking the right pair of shoes. You wouldn’t wear flip-flops to a wedding, and you wouldn’t want a ported enclosure if you’re mostly into classical music. Sealed enclosures are compact and deliver tight, accurate bass, making them great for smaller cars or anyone who prioritizes sound quality over sheer volume. Think of them as the “sneakers” of the subwoofer world – versatile and reliable.
Ported enclosures, on the other hand, are all about maximizing loudness. They use a vent to amplify the bass frequencies, resulting in a louder, deeper sound. These are your “boots” – built for power and impact, perfect if you’re looking to shake the ground. However, they do require more space and can sometimes sacrifice some accuracy for volume.
Bandpass enclosures are a bit more niche, kind of like “sandals.” They combine the features of both sealed and ported enclosures, creating a very specific frequency response. They can be incredibly loud within their intended range, but they might not be as versatile as other types. This enclosure is for the audiophile who knows exactly what they want.
Finally, there are infinite baffle setups. Imagine them as the “barefoot” option – no enclosure at all! The subwoofer is mounted directly to a panel in the car, such as the rear deck. While it can be a very effective way to get great sound, it requires precise installation and careful consideration of the vehicle’s acoustics. Unless you’re a seasoned car audio enthusiast, it might be best to leave this option to the professionals.
Matching Your Subwoofer to the Right Enclosure Size
Imagine buying a suit without trying it on first. Chances are, it wouldn’t fit properly, and you wouldn’t look your best. The same applies to matching your subwoofer to the right enclosure size. If the enclosure is too small, the subwoofer won’t be able to move freely, resulting in distorted or weak bass. If it’s too large, the bass can become boomy and uncontrolled.
So how do you find the perfect fit? Start by checking the subwoofer manufacturer’s specifications. They will usually provide recommended enclosure volumes for both sealed and ported enclosures. Think of these recommendations as the tailor’s instructions for your audio suit.
If you’re feeling adventurous, you can also use online calculators or software to determine the ideal enclosure size based on your subwoofer’s parameters. These tools take into account factors like the subwoofer’s resonant frequency and cone area to provide a more precise recommendation. Consider them as your “online tailor” offering a custom fit.
Remember that these recommendations are just starting points. You might need to fine-tune the enclosure size based on your personal preferences and the acoustics of your vehicle. Experimenting with different sizes is key to achieving the best possible sound. Don’t be afraid to try different things until you find that perfect sound.
Materials Matter: Choosing the Right Wood for Your Enclosure
Think of building a house. You wouldn’t use cardboard, would you? The same logic applies to subwoofer enclosures; the material you choose will significantly impact sound quality and durability. The most common material is MDF (Medium Density Fiberboard) because it’s dense, stable, and relatively inexpensive. Consider it the “brick” of the subwoofer enclosure world – solid and reliable.
Plywood is another option, particularly Baltic Birch plywood, which is known for its strength and void-free construction. It tends to be slightly more expensive than MDF, but it can be a good choice if you’re looking for a more durable enclosure. Think of plywood as the “reinforced concrete” – more durable, but perhaps a little more work.
Avoid using particleboard, as it’s not strong enough to withstand the vibrations produced by a subwoofer. It’s like trying to build a house out of sugar cubes – it might look good at first, but it won’t last long. It might be less expensive, but it could end up costing you more in the long run if you have to replace it down the road.
Finally, don’t forget about the importance of sealing the enclosure properly. Use a high-quality wood glue and sealant to prevent air leaks, which can degrade the sound quality. Imagine you’re sealing a submarine – you want to make sure there are no leaks that will ruin the journey!
Installation Tips: Ensuring a Secure and Proper Setup
Installing a subwoofer enclosure isn’t just about plugging it in; it’s about ensuring a secure and proper setup for optimal performance and safety. Before you even start, disconnect the negative terminal of your car battery to prevent any electrical accidents. Safety first, always!
Next, determine the best location for your enclosure. Consider factors like space availability, sound dispersion, and ease of access to wiring. Trunk space is a common spot, but under-seat installations can work well in smaller vehicles. Treat the location like you are scouting the best real estate for sound.
Securely mount the enclosure to prevent it from moving around while driving. Use appropriate mounting hardware, such as screws or bolts, and ensure they are properly tightened. An unsecured enclosure can not only damage your vehicle but can also be a safety hazard in the event of an accident. Imagine your subwoofer escaping during a hard stop – not a pretty picture.
Finally, connect the subwoofer to your amplifier using high-quality speaker wire. Ensure that the polarity is correct (+ to + and – to –) to avoid phase cancellation, which can weaken the bass response. Use a multimeter to confirm the impedance of the subwoofer and amplifier match to prevent damage. Connecting everything correctly ensures you enjoy the full sound of your system, just like a perfectly tuned instrument.
Best Car Subwoofer Enclosures Under $300: A Buying Guide
Hey there, fellow audio enthusiast! Looking to add some serious thump to your ride without breaking the bank? You’ve come to the right place. Finding the best car subwoofer enclosures under $300 can feel like navigating a minefield of jargon and conflicting opinions. But fear not! This guide is designed to be your friendly co-pilot, helping you choose the perfect enclosure to amplify your bass and transform your driving experience.
We’ll break down the essential factors you need to consider before making a purchase, ensuring you get the most bang for your buck (pun intended!). So, buckle up, and let’s dive into the world of affordable and awesome car audio!
Enclosure Type: Sealed, Ported, or Bandpass?
Alright, this is the big one. The type of enclosure significantly impacts the sound quality and overall performance of your subwoofer. Think of it like choosing the right instrument for the job. Sealed enclosures are generally known for their accuracy and tight bass response. They’re a great choice if you listen to music where clarity and detail are important, like jazz or acoustic genres. They’re also more forgiving in terms of space, often being more compact than their ported counterparts.
Ported enclosures, on the other hand, are designed to be louder and more efficient. They use a vent (or port) to amplify certain frequencies, resulting in a deeper and more impactful bass. If you’re a fan of hip-hop, EDM, or anything with a heavy bassline, a ported enclosure might be your best bet. Bandpass enclosures are more specialized and can offer extreme SPL (sound pressure level) but might sacrifice some accuracy. Since we’re aiming for the best car subwoofer enclosures under $300, which often prioritize a balance of performance and affordability, sealed or ported are typically the better choices for this budget.
Subwoofer Size Compatibility: Getting the Right Fit
This might seem obvious, but it’s crucial! You need to make sure the enclosure you choose is specifically designed for the size of your subwoofer. Trying to cram a 12-inch subwoofer into a 10-inch enclosure is a recipe for disaster. Not only will it sound terrible, but it could also damage your subwoofer. Always check the manufacturer’s specifications for both the enclosure and your subwoofer to ensure compatibility.
Consider the cutout diameter, which is the size of the hole where the subwoofer mounts. Also, pay attention to the mounting depth, which is the maximum depth your subwoofer can be without hitting the back of the enclosure. Mismatched sizes will cause frustration and wasted money. Investing a bit of time up front to ensure perfect harmony will prevent headaches down the line and guarantee optimal audio enjoyment.
Enclosure Material and Construction: Built to Last
The material and construction quality of your enclosure directly impact its durability and sonic performance. Look for enclosures made from MDF (Medium Density Fiberboard), which is a dense and rigid material that helps minimize vibrations and unwanted resonances. Thicker MDF is generally better, as it provides a more solid platform for your subwoofer.
Pay attention to the joints and seams of the enclosure. Are they securely glued and screwed together? Look for recessed joints or bracing inside the enclosure, which further strengthens the structure and prevents air leaks. A well-built enclosure will withstand the rigors of daily use and provide a stable environment for your subwoofer to perform its best. After all, you want your investment to last, providing years of booming bass.
Internal Volume: A Matter of Cubic Feet
The internal volume of the enclosure, measured in cubic feet, is a crucial factor that affects the subwoofer’s performance. Each subwoofer has an optimal internal volume range specified by the manufacturer. This information is vital for achieving the best sound quality. Too little volume can result in weak and distorted bass, while too much volume can lead to a boomy and uncontrolled sound.
Before you buy, carefully research the recommended internal volume for your specific subwoofer model. Then, look for enclosures that fall within that range. Some enclosures will list the net internal volume, which is the volume after accounting for the space taken up by the subwoofer itself. This is the most accurate measurement to use. If the enclosure only lists the gross internal volume, you’ll need to subtract the subwoofer’s displacement to determine the net volume. Getting this right is key to unlocking the full potential of your subwoofer.
Impedance Matching: Ohms Sweet Home
Impedance matching is a crucial electrical concept that often gets overlooked, but it’s essential for proper subwoofer performance and amplifier protection. Subwoofers come in different impedance ratings, typically 2 ohms or 4 ohms. Your amplifier also has an impedance rating, which indicates the load it’s designed to handle. Mismatching the impedance can lead to reduced power output, distortion, or even damage to your amplifier.
If you’re using a single subwoofer, make sure its impedance matches the impedance rating of your amplifier. If you’re using multiple subwoofers, you’ll need to wire them in series or parallel to achieve the desired impedance. Online calculators and wiring diagrams are readily available to help you with this. Take the time to understand impedance matching – it will ensure your system is running efficiently and safely. This knowledge makes selecting the best car subwoofer enclosures under $300 easier.
Pre-loaded vs. Empty Enclosures: DIY or Ready to Rock?
Now, let’s talk about convenience. You have two main options: pre-loaded enclosures, which come with a subwoofer already installed, and empty enclosures, which allow you to install your own subwoofer. Pre-loaded enclosures are a great option if you want a hassle-free solution. They’re typically designed to be a good match for the included subwoofer, saving you the guesswork of choosing the right components. However, you may be limited in terms of subwoofer choices.
Empty enclosures, on the other hand, offer more flexibility. You can choose the exact subwoofer that fits your needs and preferences. However, you’ll need to have some basic knowledge of car audio installation to properly mount and wire the subwoofer. For the best car subwoofer enclosures under $300, an empty enclosure may provide more options for a higher quality subwoofer at the same price point as a pre-loaded option. Consider your skill level and desired level of customization when making this decision.
Space Considerations: Where Will It Live?
Before you even start browsing enclosures, take some measurements of the available space in your vehicle. Subwoofer enclosures come in various shapes and sizes, and you need to make sure the one you choose will actually fit comfortably in your car. Consider the height, width, and depth of the enclosure, and think about where you plan to install it. Trunks, under seats, and even custom installations are all possibilities, but each requires careful planning.
Don’t forget to factor in any obstructions, such as spare tires or other equipment. It’s always better to overestimate the space you need than to end up with an enclosure that doesn’t fit. Think about the practicalities of everyday use – will the enclosure block access to your trunk or rear seats? Prioritizing space considerations from the start will ensure a smooth installation and a happy audio experience. This is critical when looking for the best car subwoofer enclosures under $300.
FAQs
What exactly *is* a subwoofer enclosure, and why do I need one?
Think of a subwoofer enclosure as the “home” for your subwoofer. It’s a specially designed box that holds the subwoofer driver and plays a crucial role in shaping the sound quality and volume of your bass. Without an enclosure, the sound waves produced by the front and back of the subwoofer cone would cancel each other out, resulting in very weak and muddy bass. It’s like trying to hear a guitar string vibrate in open air – it’s there, but it lacks the punch and resonance you get when it’s attached to the body of the guitar.
The enclosure design (sealed, ported, bandpass, etc.) drastically affects the subwoofer’s performance. The enclosure type controls how the air inside the box interacts with the subwoofer cone, tuning the bass response and dictating how loud and deep the bass will be. An enclosure helps to create an environment for the subwoofer to efficiently move air and give you the powerful bass you’re looking for. Ultimately, it’s the difference between hearing some bass and feeling the bass.
How do I choose the right size enclosure for my subwoofer?
Choosing the right size enclosure is incredibly important, and it really comes down to matching the enclosure volume with your specific subwoofer’s requirements. You’ll find this information in the subwoofer’s specifications, usually listed as the “recommended enclosure volume” – often in cubic feet. Think of it like baking a cake; using the wrong amount of ingredients will affect the final result! Too small, and your subwoofer might sound strained and lack deep bass. Too large, and the bass might be boomy and uncontrolled.
Don’t worry, though! This information is readily available from the subwoofer manufacturer’s website or the product documentation. If you’re unsure, online subwoofer enclosure calculators can also be very helpful. Just input your subwoofer’s parameters, and they’ll suggest an optimal enclosure volume. It’s a good idea to check the specs and research the best type and size enclosure that’s compatible with the model of the subwoofer you already have.
What are the different types of subwoofer enclosures, and which is best for me?
There are several types of subwoofer enclosures, each with its unique characteristics and sound signature. The most common are sealed, ported (vented), and bandpass. Sealed enclosures are known for their accurate and tight bass response, often favored for music genres that benefit from detailed and controlled bass. They’re also generally smaller and easier to build.
Ported enclosures are designed with a vent or port that allows air to escape the enclosure, boosting bass output at specific frequencies. This results in louder and deeper bass, making them a great choice for genres like hip-hop or electronic music. However, they can sometimes sound less accurate than sealed enclosures. Bandpass enclosures are a bit more complex, offering high output within a narrow frequency range, but they aren’t as common for car audio. Ultimately, the “best” type depends on your personal preferences and the type of music you listen to most.
Can I build my own subwoofer enclosure, or should I just buy one?
Building your own subwoofer enclosure can be a rewarding project, allowing you to customize it to your exact specifications and potentially save some money. However, it requires some woodworking skills, the right tools (like a saw, drill, and measuring tape), and an understanding of enclosure design principles. If you’re comfortable with these things, building your own can be a great option.
On the other hand, buying a pre-built enclosure offers convenience and ensures that the enclosure is built to the correct specifications. These enclosures are often made from high-quality materials and are available in a variety of sizes and designs. If you’re not confident in your woodworking abilities or simply prefer the convenience of a ready-made solution, buying an enclosure is definitely the way to go. In the end, the best option depends on your skill level, time commitment, and budget.
Will a pre-made enclosure really sound as good as a custom-built one?
That’s a great question, and the answer is…it depends! A well-designed and properly constructed pre-made enclosure can absolutely sound fantastic. Many manufacturers invest heavily in research and development to ensure their enclosures offer optimal performance for a wide range of subwoofers. The quality of the materials and construction is a vital part to the equation, so opting for a brand with good reviews is often the way to go.
However, a custom-built enclosure can be tailored to your exact subwoofer specifications and vehicle dimensions, potentially maximizing its performance. If you have a very specific set of requirements or want to optimize every last decibel, a custom enclosure might be worth the investment. For most people, a good quality pre-made enclosure will provide excellent sound and convenience without breaking the bank.
How do I properly wire my subwoofer to the enclosure and my amplifier?
Wiring your subwoofer correctly is crucial for optimal performance and to prevent damage to your equipment. Start by identifying the positive (+) and negative (-) terminals on both your subwoofer and your amplifier. Make sure to use high-quality speaker wire of the appropriate gauge – usually 12 or 14 gauge is recommended for subwoofers.
The most common wiring configurations are series and parallel. In a series configuration, you connect the positive terminal of one subwoofer to the negative terminal of the other, effectively increasing the impedance. In a parallel configuration, you connect the positive terminals together and the negative terminals together, decreasing the impedance. Refer to your amplifier’s manual to determine the optimal impedance for your subwoofer configuration. Once you’ve determined the correct wiring configuration, simply connect the speaker wire from the enclosure’s terminals to the corresponding terminals on your amplifier, ensuring a secure and clean connection.
What if the pre-made enclosure I buy doesn’t *exactly* match my subwoofer’s recommended volume?
It’s not uncommon to find that a pre-made enclosure isn’t a perfect match for your subwoofer’s ideal volume, but don’t fret! Small deviations usually won’t have a drastic impact on performance. If the enclosure is slightly larger than recommended, you might experience a slightly boomier bass response.
If the enclosure is smaller than recommended, you can compensate by adding polyfill (a synthetic stuffing material) inside the enclosure. Polyfill effectively makes the enclosure “appear” larger to the subwoofer by slowing down the sound waves inside the box. Just be sure to use a reasonable amount of polyfill – too much can actually dampen the subwoofer’s output. If you’re concerned about the fit, consider choosing a versatile enclosure that comes as close as possible to the recommended volume.
Verdict
So there you have it! We’ve journeyed through the realm of the best car subwoofer enclosures under $300, arming you with the knowledge to make a seriously informed decision. From sealed to ported, we’ve uncovered the hidden gems that’ll transform your car audio experience without emptying your wallet. Remember, the perfect enclosure is out there, waiting to be discovered, ready to unlock the true potential of your subwoofer.
Now, it’s time to take the plunge and turn up the volume on your driving soundtrack! Don’t be afraid to experiment, to listen critically, and to trust your gut. With the information you’ve gained, you’re well-equipped to choose an enclosure that delivers the bass you’ve been dreaming of. Go forth, find your perfect match, and get ready to feel the beat!