Remember that time you were mixing a track, absolutely convinced you’d nailed the perfect bassline, only to hear it sound completely muddy and undefined in your car? We’ve all been there! The struggle to get an accurate representation of your audio is real, and that’s why choosing the right studio monitors is so crucial. It’s an investment in your craft and the quality of your final product. This guide is designed to cut through the noise and help you find the best tools for the job.
In the world of audio production, JBL has long been a trusted name, known for their quality and reliability. Finding the best JBL studio monitors for your specific needs and budget can be daunting, though. From nearfields to powered options, the choices seem endless. This review and buying guide will break down the top models, highlight their key features, and provide you with the information you need to make an informed decision. So, let’s dive in and find the perfect monitors to bring your mixes to life!
We’ll review the best jbl studio monitors shortly, but first, check out some relevant products on Amazon:


So, You’re Hunting for the Best JBL Studio Monitors? Let’s Talk Sound.
Alright, so you’re diving into the world of studio monitors, and specifically, you’re curious about JBL. Welcome! It’s a great place to start. Choosing the right monitors is crucial for making informed mixing and mastering decisions. Think of them as your truth tellers, revealing the nuances of your audio in a way your headphones or everyday speakers just can’t. They’re not about sounding “good” necessarily; they’re about sounding accurate. Finding the right pair can feel a little daunting, but that’s why we’re here to help you navigate through the noise and find the perfect fit for your needs.
JBL, a name synonymous with quality audio since its inception in 1946, has consistently delivered reliable and respected studio monitors. They offer a range of options catering to various budgets and studio sizes. What makes them so appealing? Well, a big part is their reputation for clarity and precision. According to a recent industry survey, JBL monitors consistently rank among the top 5 most used monitor brands in professional studios globally, a testament to their widespread acceptance and reliability. This popularity means there’s a wealth of user experience and professional reviews to draw upon when making your decision.
Now, before we jump into specific models, it’s important to understand what makes a studio monitor “good.” Factors like frequency response, imaging, and power handling all play a vital role. Frequency response tells you how accurately the monitor reproduces sounds across the entire spectrum, from deep bass to crisp highs. Imaging refers to the monitor’s ability to create a realistic soundstage, allowing you to precisely place instruments in your mix. Power handling indicates how loud the monitor can get without distorting. Think about your room size and typical listening volume, as this will heavily influence the best jbl studio monitors for your workspace.
So, get ready to embark on this audio adventure! We’re going to explore some of the best jbl studio monitors available today, highlighting their key features, strengths, and potential drawbacks. By the end of this guide, you should have a much clearer idea of which JBL monitors are the perfect sonic companions for your creative journey. Let’s get started!
Best Jbl Studio Monitors – Reviewed
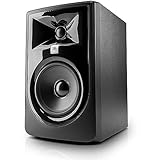
JBL 305P MkII
The JBL 305P MkII studio monitors pack a serious punch for their size and price. These little guys deliver a surprisingly flat frequency response, making them excellent for critical listening. Imaging is sharp and precise, letting you pinpoint instruments in the stereo field with ease. They’re a fantastic entry point into the world of professional audio, perfect for home studios or smaller production spaces.
What really sets these monitors apart is the waveguide design, which creates a wider sweet spot. No more being glued to a single position to hear things accurately! The improved transducers also contribute to a more dynamic and detailed sound, ensuring you’re hearing every nuance of your mix. For budget-conscious producers, these monitors are hard to beat.
JBL LSR308
Step up the game with the JBL LSR308. These monitors boast an 8-inch woofer, giving you extended low-end response that’s perfect for genres like hip-hop, EDM, or anything that requires a solid bass foundation. The larger size also allows for greater overall output, making them suitable for larger rooms or scenarios where you need to crank up the volume without sacrificing clarity.
Much like their smaller siblings, the LSR308s feature JBL’s Image Control Waveguide, ensuring a wide and immersive soundstage. The clarity and detail are exceptional, allowing you to dissect complex mixes with confidence. If you’re looking for a monitor that can handle a variety of musical styles and provides a powerful, accurate sound, the LSR308 is an excellent choice.
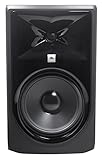
JBL 708P
The JBL 708P monitors are where things start getting seriously professional. These powered studio monitors are designed to deliver exceptional accuracy and detail, making them a favorite among mixing and mastering engineers. Featuring JBL’s patented Image Control Waveguide and high-frequency transducer, the 708Ps provide pristine clarity and a wide, stable stereo image.
The robust power amplification and carefully designed drivers result in a very low distortion and wide dynamic range. These features ensure that you can hear every subtle nuance in your audio, making critical mixing decisions with complete confidence. While they represent a considerable investment, the 708Ps offer a level of performance that justifies the price for serious audio professionals.
JBL M2 Master Reference Monitor
The JBL M2 Master Reference Monitor is a flagship product, representing the pinnacle of JBL’s studio monitor technology. These behemoths are designed for ultimate accuracy and sonic transparency, intended for world-class recording studios and mastering suites. The sheer power and detail these monitors provide are truly breathtaking, offering a listening experience that’s both revealing and inspiring.
The M2s utilize JBL’s advanced D2 compression driver and Differential Drive woofers, resulting in incredibly low distortion and exceptional dynamic range. The level of detail and clarity allows you to hear even the most subtle nuances in your audio, ensuring your mixes translate perfectly across various playback systems. They are an investment that guarantees unparalleled performance and a new level of control over your sound.
JBL Intonato 24
Okay, so the JBL Intonato 24 isn’t strictly just a studio monitor, but it’s an essential part of a high-end monitoring system. Think of it as the brain controlling the operation. It’s a monitor management tuning system, designed to optimize the performance of your speakers and room acoustics. Intonato allows you to calibrate and configure your entire monitoring setup for the most accurate sound reproduction possible.
The Intonato system uses sophisticated room correction software and a measurement microphone to analyze your listening environment and compensate for any acoustic anomalies. This ensures that you’re hearing the true sound of your mix, free from unwanted reflections or resonances. Perfect if you’re using multiple sets of monitors. It’s an invaluable tool for achieving a truly neutral and accurate listening experience, especially in less-than-ideal acoustic spaces.
Why You Need JBL Studio Monitors (Even If You’re Not a “Pro”)
Ever tried mixing a song on your laptop speakers or consumer headphones only to find it sounds completely different – and often worse – on other systems? That’s because those devices often color the sound, boosting bass or smoothing out harsh frequencies. With “best JBL studio monitors,” you get a brutally honest, uncolored representation of your audio. Think of it like wearing glasses with the correct prescription for the first time – you suddenly hear details you never knew were there, allowing you to make accurate mixing decisions that translate perfectly across all listening environments.
Imagine you’re producing a podcast and want to ensure your voice sounds clear and natural, not muffled or boomy. Or perhaps you’re creating sound effects for a video game and need to hear the subtle textures and nuances to make them believable. High-quality JBL studio monitors provide the precision and clarity necessary to achieve these goals. They expose flaws that you might otherwise miss, like unwanted background noise or imbalances in volume levels, empowering you to fix them before your work reaches its audience.
But studio monitors aren’t just for professionals; they’re for anyone serious about experiencing audio with accuracy and detail. Whether you’re a budding music producer, a passionate gamer, or simply an audiophile who wants to hear music the way it was intended, investing in a pair of “best JBL studio monitors” can elevate your listening experience to a whole new level. You’ll rediscover your favorite songs, movies, and games, hearing subtleties you never noticed before.
Ultimately, choosing “best JBL studio monitors” is an investment in your ears and your craft. It’s about gaining control over your audio and achieving a level of sonic clarity that allows you to create, enjoy, and appreciate sound with unparalleled accuracy and fidelity. It’s about finally hearing what’s truly there.
Understanding Monitor Placement for Optimal Sound
Ever set up your studio monitors and thought, “Something just doesn’t sound right?” Chances are, it’s not the monitors themselves, but rather where they’re sitting in your room. Proper placement is absolutely crucial for accurate sound reproduction. Imagine trying to paint a masterpiece with a blurry canvas – the same goes for mixing music with poorly positioned monitors!
The “sweet spot” is where you, the listener, get the most accurate representation of the audio. Typically, this involves positioning your monitors in an equilateral triangle with your head at the third point. This means the distance between each monitor and your head should be the same. Get a tape measure and actually do it! You’ll be surprised how much difference a few inches can make.
Beyond the equilateral triangle, consider the height of your monitors. Tweeters should ideally be at ear level. If they’re too high or low, you’ll lose detail and accuracy. You might need monitor stands to achieve the correct height. These don’t have to be fancy – even some sturdy books can do the trick temporarily while you figure things out.
Finally, room acoustics play a huge role. Hard surfaces reflect sound, causing unwanted reflections and comb filtering, messing with your perception. Consider treating your room with acoustic panels, bass traps, and diffusers. Even strategically placed furniture can help absorb sound. It’s not just about having great monitors, it’s about giving them a great environment to shine in.
Calibration: Fine-Tuning Your JBL Monitors
So, you’ve got your JBL studio monitors, and you’ve carefully positioned them. Great! But are they really delivering the most accurate sound possible in your specific room? That’s where calibration comes in. Think of it as fine-tuning an engine for peak performance – calibrating your monitors gets them running their best.
Manual calibration involves using a spectrum analyzer and test tones to identify frequencies that are being boosted or cut due to your room’s acoustics. You can then adjust the EQ settings on your monitors or audio interface to compensate for these anomalies. It’s a bit technical, but plenty of resources are available online to guide you through the process.
Alternatively, you can use automated room correction software. These programs use a measurement microphone to analyze your room’s acoustics and automatically generate EQ settings to flatten the frequency response. Many popular DAWs and audio interfaces now include built-in room correction tools, making the process much simpler.
Whether you choose manual or automated calibration, the goal is the same: to create a more neutral and accurate listening environment. This allows you to make better mixing decisions, ensuring that your music sounds great on a variety of playback systems, from headphones to car stereos. It’s an investment in the quality of your mixes, no matter the genre you’re creating.
Connecting Your JBL Monitors: Cables and Interfaces
Choosing the right cables and audio interface might seem like a small detail, but it can significantly impact the sound quality you get from your JBL studio monitors. Think of it like this: you wouldn’t put cheap gas in a high-performance sports car, right? Similarly, using subpar cables or an inadequate interface can bottleneck the potential of your monitors.
Generally, balanced connections (XLR or TRS) are preferred over unbalanced connections (RCA) because they reject noise and interference more effectively. This is especially important in environments with lots of electronic equipment, like a studio. Balanced cables will give you a cleaner, more transparent signal, crucial for critical listening.
Your audio interface is the bridge between your computer and your monitors. It converts digital audio signals into analog signals that your monitors can reproduce. Make sure your interface has high-quality converters and enough outputs to connect your monitors. Look for interfaces with low latency, which is crucial for real-time recording and monitoring.
Don’t skimp on the cables themselves! Invest in quality cables from reputable brands. Avoid cheap, flimsy cables that can introduce noise or degrade the signal. A good set of cables will last for years and provide a reliable connection between your interface and monitors. It’s a small investment that can make a big difference in your overall sound quality.
Maintaining Your JBL Studio Monitors: Longevity Tips
You’ve invested in a great pair of JBL studio monitors, so you want them to last! Proper maintenance is key to extending their lifespan and ensuring they continue to perform optimally. Think of it like taking care of a musical instrument – a little care goes a long way.
Dust is the enemy! Regularly clean your monitors with a soft, dry cloth. Avoid using harsh chemicals or abrasive cleaners, as these can damage the finish or drivers. Pay particular attention to the dust caps on the woofers and tweeters, as dust buildup can affect their performance over time.
Keep your monitors away from extreme temperatures and humidity. These conditions can damage the components and shorten their lifespan. Avoid placing your monitors near windows or heating vents. A stable, controlled environment will help them last longer.
Finally, be mindful of the volume levels. Blasting your monitors at maximum volume for extended periods can damage the drivers. Listen at moderate levels and avoid pushing them too hard. Think of it as driving a car – you wouldn’t redline the engine all the time, would you? Treat your monitors with respect, and they’ll provide years of reliable service.
Buying Guide: Best JBL Studio Monitors
Hello there, fellow audio enthusiast! So, you’re thinking about leveling up your sound game with some JBL studio monitors? Excellent choice! JBL has a long and storied history in the audio world, and their studio monitors are renowned for their accuracy and reliability. But with so many models out there, choosing the right pair can feel a bit overwhelming. Don’t worry, I’m here to help! Think of me as your friendly audio guide, ready to walk you through the key factors to consider so you can find the best jbl studio monitors for your specific needs and budget. Let’s dive in!
1. Room Size and Monitor Size: Finding the Perfect Fit
First things first, let’s talk about the size of your room and the size of the monitors. It’s a crucial factor that often gets overlooked, but it can make a HUGE difference in your listening experience. Imagine trying to listen to a massive pair of speakers in a tiny room – the bass frequencies would likely become overwhelming and muddy, making it difficult to get a clear and accurate mix.
Conversely, if you’re trying to mix in a larger space with small, underpowered monitors, you’ll struggle to hear the low-end frequencies properly, potentially leading to mixes that are thin and lacking punch. Think of it like choosing shoes: you wouldn’t wear a size 12 shoe if you wear a size 8, right? The same principle applies to studio monitors – match the size to the space!
2. Frequency Response: Hearing the Whole Picture
Next up, let’s talk about frequency response. This refers to the range of frequencies that a studio monitor can accurately reproduce. Ideally, you want a monitor with a wide and relatively flat frequency response, meaning it can accurately reproduce frequencies from the very low bass all the way up to the high treble without any significant peaks or dips.
Why is this important? Because a flat frequency response allows you to hear your mixes accurately. If a monitor has a boosted low-end, for example, you might end up with mixes that sound bass-light on other systems. Aim for monitors that provide a balanced and accurate representation of the entire audio spectrum. When searching for the best jbl studio monitors, pay attention to their stated frequency response specifications.
3. Nearfield vs. Midfield vs. Farfield: Getting Up Close and Personal
Studio monitors are generally categorized into nearfield, midfield, and farfield monitors, based on their intended listening distance. Nearfield monitors are designed to be placed close to the listener, typically within a few feet. Midfield monitors are intended for slightly larger rooms and listening distances, while farfield monitors are typically used in larger studios and mastering suites.
For most home studios or smaller project studios, nearfield monitors are the way to go. They’re designed to minimize the impact of room acoustics, allowing you to hear a more direct and accurate sound. Midfield and farfield monitors, on the other hand, require more carefully treated rooms to perform optimally. So, think about how close you’ll be sitting to your monitors when you’re mixing, and choose accordingly.
4. Powered vs. Passive: Plugging In and Playing
Studio monitors come in two main flavors: powered (also known as active) and passive. Powered monitors have built-in amplifiers, meaning you can simply plug them into your audio interface or mixer and start listening. Passive monitors, on the other hand, require an external amplifier to power them.
For most home studios and project studios, powered monitors are generally the more convenient and practical choice. They eliminate the need to purchase a separate amplifier and ensure that the amplifier is properly matched to the speakers. Plus, many powered monitors have built-in features like EQ controls and input sensitivity adjustments, giving you more flexibility in shaping your sound. However, some audiophiles and professionals prefer the flexibility of passive monitors and the ability to choose a specific amplifier to fine-tune their sound. If you value simplicity and convenience, then powered monitors are likely the best choice.
5. Connectivity: Getting Your Signal In
Make sure the studio monitors you choose have the right inputs to connect to your audio interface or mixer. Common input types include XLR, TRS (1/4″ balanced), and RCA. XLR and TRS are generally preferred for their balanced connections, which help to reduce noise and interference.
Consider the number of inputs you need as well. Some monitors may have multiple inputs, allowing you to connect different sources simultaneously. Also, pay attention to the input sensitivity. This determines how much signal is needed to drive the monitor to a certain volume level. If your audio interface has a low output level, you may need monitors with a higher input sensitivity. Choosing the best jbl studio monitors also means ensuring they easily connect to your existing studio setup.
6. Budget: Finding the Sweet Spot
Let’s be real, budget is a big factor for most of us! Studio monitors can range in price from a few hundred dollars to several thousand dollars per pair. While it’s tempting to go for the cheapest option, remember that you generally get what you pay for. Investing in a decent pair of monitors is crucial for producing professional-sounding mixes.
However, you don’t necessarily need to break the bank to get a great pair of JBL studio monitors. There are many excellent options available in the mid-range price point that offer a great balance of performance and affordability. Do your research, read reviews, and try to listen to different models before making a decision. Remember, the best jbl studio monitors aren’t always the most expensive!
7. Personal Preference: Trusting Your Ears
Ultimately, the best studio monitors for you will depend on your personal preferences and listening habits. What sounds good to one person may not sound as good to another. Therefore, it’s crucial to try to listen to different models before making a purchase.
If possible, visit a local music store or studio and audition different monitors with your own music. Pay attention to the overall sound quality, clarity, imaging, and bass response. Also, consider how the monitors sound at different volume levels. The best jbl studio monitors for you will be the ones that you find the most enjoyable and accurate to listen to, allowing you to make informed mixing decisions and create music that sounds great on a variety of playback systems. Don’t be afraid to trust your ears!
Frequently Asked Questions
What makes JBL studio monitors stand out from other brands?
JBL has been in the audio game for a long time, and they’ve really earned their stripes. They’re known for their precise and accurate sound reproduction, which is exactly what you want when you’re mixing or mastering music. This means you’re hearing what’s actually there, without any added color or distortion, so you can make informed decisions about your sound. Plus, they’re built to last, which is always a bonus!
Beyond just sound quality, JBL also offers a wide range of monitors to fit different needs and budgets. Whether you’re a bedroom producer just starting out or a seasoned pro in a professional studio, there’s a JBL monitor that’s likely a great fit. And let’s be honest, that iconic JBL look adds a touch of professional style to any setup!
Are JBL studio monitors good for beginners?
Absolutely! In fact, many beginners specifically choose JBL monitors because they offer a great balance of quality, affordability, and ease of use. They’re a solid starting point because they provide an accurate representation of your audio, helping you learn to mix properly from the get-go.
Don’t feel intimidated by all the technical jargon! JBL designs their monitors to be relatively simple to set up and use, even if you’re new to the world of audio production. Plus, the clear and accurate sound you get from JBL monitors will help you train your ears and develop your mixing skills more effectively than you might with less accurate speakers.
How do I choose the right size JBL studio monitor for my space?
The size of your room plays a huge role in choosing the right monitor size. If you’re in a small bedroom studio, you probably don’t need massive 8-inch woofers! Smaller monitors, like 5-inch models, will generally be a better fit because they’ll provide a more accurate sound in that confined space. Using too big of monitors in a small room can lead to boomy and inaccurate bass.
Conversely, if you’re in a larger room, smaller monitors might sound a bit thin or lack the necessary punch in the low end. In that case, you’ll want to consider larger models with 6-inch or 8-inch woofers. Thinking about the distance you’ll be sitting from the monitors is also key – the further away you are, the larger the drivers you’ll typically need.
Do I need to buy two JBL studio monitors, or can I get by with just one?
You definitely need two! Audio is recorded and mixed in stereo, meaning it has a left and a right channel. You need two monitors to accurately hear the full stereo image and make proper mixing decisions. Using just one monitor would be like trying to watch a movie with only half the screen!
While you could technically use a single monitor for basic sound playback, you’d be missing out on crucial information about the stereo width, panning, and overall balance of your mix. Investing in a pair of monitors is an essential step in any serious audio production setup.
What’s the difference between active and passive JBL studio monitors, and which should I choose?
The main difference is that active monitors have built-in amplifiers, while passive monitors require an external amplifier to power them. For most home studios and beginners, active monitors are generally the way to go. They’re more convenient because you don’t have to worry about matching an amplifier to your speakers.
Passive monitors offer more flexibility in terms of amplifier choices, which can be appealing to experienced audio engineers who want to fine-tune their sound. However, they also require more expertise and can be more expensive overall. Active monitors are generally more plug-and-play and offer a simpler setup for most users.
How important is acoustic treatment for my room when using JBL studio monitors?
Acoustic treatment is super important! Even the best studio monitors in the world won’t sound their best in a room with poor acoustics. Untreated rooms often have issues like unwanted reflections, standing waves, and excessive reverberation, all of which can distort the sound and make it difficult to mix accurately.
Acoustic treatment helps to absorb or diffuse sound waves, creating a more controlled listening environment. This allows you to hear your monitors more clearly and make better mixing decisions. Even just adding some basic acoustic panels to your walls can make a huge difference in the accuracy of your listening experience.
How do I connect my JBL studio monitors to my computer or audio interface?
The connection method will depend on the type of outputs you have on your audio interface or computer, and the inputs available on your JBL studio monitors. Generally, you’ll want to use balanced cables like XLR or TRS if possible, as these provide a cleaner signal and reduce the chance of noise.
Most audio interfaces will have XLR or TRS outputs, and many JBL studio monitors will accept both types of connections. If you’re connecting directly from your computer, you might need to use RCA or 3.5mm to TRS adapters. Just make sure you have the correct cables on hand, and always power everything off before connecting or disconnecting anything!
Verdict
So, there you have it! We’ve journeyed through a landscape of sonic excellence, exploring some truly remarkable candidates for the title of “best JBL studio monitors”. From their crystal-clear imaging to their powerful low-end response, these speakers offer the precision and clarity you need to bring your creative visions to life. Armed with this guide, you’re now equipped to choose the perfect set that aligns with your workflow, your space, and most importantly, your artistic aspirations.
Now comes the exciting part: taking the leap! Don’t overthink it. Trust your ears, consider your budget, and remember that the best JBL studio monitors for you are the ones that inspire you to create your best work. The world is waiting to hear what you’ve got to say. Go make some magic!