Remember that time you laid down what you thought was the perfect vocal take, only to listen back and hear a muddy mess of echoes and unwanted room reflections? Or spent hours crafting a killer guitar riff, only to have the brilliance swallowed by a cavernous, uncontrolled sound? We’ve all been there, fighting the physics of our recording spaces. Creating a professional-sounding recording isn’t just about having fancy mics and a powerful DAW; it’s about controlling the acoustics within your studio environment. Taming those unruly sound waves is crucial for getting clean, crisp recordings that translate well across different playback systems.
That’s where the best recording studio acoustical treatments come in. This guide is designed to help you navigate the often confusing world of sound absorption, diffusion, and bass trapping. We’ll break down the different types of treatments, explain how they work, and review some of the top-rated products on the market. Whether you’re converting a spare bedroom into a project studio or fine-tuning a professional facility, understanding and implementing proper acoustical treatment is an investment in the quality of your recordings and ultimately, your craft.
We’ll review the best recording studio acoustical treatments shortly, but first, check out some relevant products on Amazon:


The Quest for Sonic Bliss: Taming Your Recording Space
So, you’re ready to transform that spare room, basement, or garage into your personal recording haven? That’s fantastic! But before you plug in your mics and start laying down tracks, let’s talk about something crucial: the sound. Untreated rooms can be a nightmare, turning your recordings into a muddy, echoey mess, no matter how great your gear is. We’re talking about reflections bouncing off walls, creating unwanted resonances, and generally making your audio sound less than professional. It’s estimated that up to 70% of the clarity of a recording depends on the acoustics of the room.
Think of it like this: imagine singing in a shower versus singing in a concert hall. The shower’s hard surfaces create a boomy, unpleasant sound. The concert hall, on the other hand, is carefully designed to enhance the music. Your recording space needs that concert hall treatment, but on a smaller, more manageable scale. This isn’t about making your room completely dead; it’s about controlling the reflections and resonances to achieve a balanced and clear sound.
This is where the world of acoustical treatment comes in! You might have heard of things like bass traps, acoustic panels, diffusers, and maybe even clouds (no, not the fluffy kind!). These are the tools we use to shape the sound of our recording space. Understanding how each of these works and how to strategically place them is essential to getting the most out of your recordings, and finding the best recording studio acoustical treatments for your specific needs.
Choosing the right tools and understanding how they interact with your specific room is key. In this guide, we will explore the world of “best recording studio acoustical treatments” so you can start building the perfect environment for your audio creations, regardless of your budget or space constraints. We’ll demystify the jargon and give you practical advice to create a recording space that sounds just as good as your music deserves. Let’s dive in!
Top 5 Best Recording Studio Acoustical Treatments
Auralex Acoustics Studiofoam Wedges
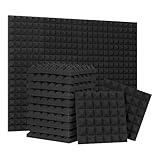
Auralex Studiofoam Wedges are a classic for a reason! These guys are like the Swiss Army knife of acoustic treatment. They’re incredibly versatile, tackling a wide range of frequencies to tame those unwanted reflections and standing waves that can muck up your recordings. The wedge shape isn’t just for looks; it optimizes sound absorption, making your room sound tighter and more controlled.
Installation is a breeze with some spray adhesive, and you can customize their placement to target specific problem areas. Whether you’re treating a full-blown professional studio or a humble home setup, these foam wedges offer a noticeable improvement in clarity and accuracy, helping you create mixes that translate well to other listening environments. A solid investment for anyone serious about their sound.
GIK Acoustics 242 Acoustic Panels
If you’re looking for a step up in both performance and aesthetics, GIK Acoustics 242 Acoustic Panels are definitely worth considering. These panels are more than just foam; they’re constructed with a rigid fiberglass core wrapped in fabric, providing excellent broadband absorption. This means they effectively deal with a broader spectrum of frequencies compared to typical foam, resulting in a more balanced and natural-sounding room.
The GIK 242s not only enhance the acoustic environment but also add a touch of professionalism to your studio space. Available in a variety of fabric colors and sizes, they can be easily integrated into any room design. Plus, they are built with high-quality materials and construction, ensuring long-lasting performance and durability. You get both sonic accuracy and visual appeal – a winning combination.
Primacoustic Broadway Panels
Primacoustic Broadway Panels are the heavy hitters of acoustic treatment. When you need serious sound control, especially in challenging spaces with low-frequency issues, these panels are a fantastic option. They are built with high-density fiberglass and a tight weave fabric, providing superior absorption across the frequency spectrum, including those pesky bass frequencies that can make your mixes muddy.
These panels are built to last and offer excellent fire-resistance, a crucial consideration for any studio environment. Their professional appearance and superior performance make them a popular choice for high-end recording studios and post-production facilities. While they might be a bit pricier than some other options, the investment in Broadway Panels pays off in the form of a noticeably cleaner and more accurate listening environment.
RealTraps MondoTraps
Bass traps are essential for taming those low-end frequencies that can cause havoc in a studio, and RealTraps MondoTraps are some of the best in the game. These corner-mounted traps are designed specifically to absorb bass energy, reducing room modes and improving the overall clarity and tightness of your low-end response. This results in mixes with greater definition and punch.
MondoTraps are incredibly effective due to their large size and strategically placed internal damping. Their cylindrical design maximizes absorption efficiency, making them a powerhouse for bass management. While they may take up some corner space, the improvement in your low-end accuracy is well worth the trade-off. If you’re struggling with muddy bass in your room, MondoTraps could be the solution you’ve been searching for.
Vicoustic Flexi Panel A50
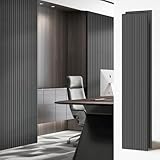
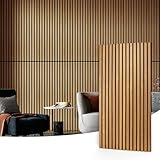
For a blend of acoustic treatment and visual artistry, look no further than Vicoustic Flexi Panel A50. These panels not only absorb sound but also diffuse it, scattering sound waves in different directions to create a more natural and lively acoustic environment. This diffusion helps to prevent flutter echoes and standing waves without making the room sound overly dead.
The Flexi Panel A50s are available in a variety of stylish finishes and patterns, allowing you to customize your studio’s aesthetic while improving its sonic properties. They’re relatively lightweight and easy to install, making them a great option for both small and large spaces. These panels are ideal for those looking to add both functionality and visual appeal to their recording environment.
Why Invest in Recording Studio Acoustical Treatments?
Imagine you’re trying to record the perfect acoustic guitar riff, but instead of crisp notes, you hear a muddy, echoing mess. Or picture a vocalist pouring their heart out, only for their performance to be marred by harsh reflections and comb filtering. These sonic gremlins are the result of untreated room acoustics, where sound waves bounce around uncontrollably, creating undesirable resonances and interfering with the clarity of your recordings. Investing in acoustical treatments is like giving your sound waves a safe and predictable path, allowing them to reach the microphone without unwanted baggage.
Think of your recording space as an instrument itself. Just like a guitar needs proper setup and tuning, a room needs acoustical treatment to sound its best. Without it, you’re essentially fighting a losing battle against the room’s natural tendencies. The “best recording studio acoustical treatments” work by absorbing, diffusing, and trapping sound waves, preventing them from building up and causing issues. This means clearer, more accurate recordings that capture the true essence of your sound.
These treatments aren’t just for professional studios; they benefit any space where sound matters. Whether you’re a musician, voice-over artist, podcaster, or even just someone who wants to enjoy music in a more refined way, acoustical treatments can dramatically improve the listening experience. Imagine hearing every nuance of your favorite song with pinpoint accuracy, or delivering a podcast episode with a smooth, professional sound. The difference is night and day.
Ultimately, investing in acoustical treatments is an investment in the quality of your work. It’s about creating a controlled and predictable environment where your creativity can thrive. By taming the unwanted reflections and resonances, you unlock the true potential of your recording equipment and your own artistic expression. The “best recording studio acoustical treatments” are more than just sound-absorbing panels; they’re tools that empower you to capture and create the best possible sound.
Acoustic Treatment vs. Soundproofing: What’s the Difference?
Ever been to a concert where the music was so loud you felt it in your chest? That’s sound energy escaping the venue. Soundproofing aims to block sound from entering or leaving a space. Think of it as building a fortress for sound. We’re talking about things like thick walls, double-paned windows, and sealed doors. It’s about preventing noise pollution from disturbing your neighbors, or vice-versa, keeping outside noise from ruining a perfect take.
On the other hand, acoustic treatment is all about what happens to the sound inside the room. Imagine yelling in a cathedral versus yelling in a field. The reverberation in the cathedral is a result of untreated acoustics. Acoustic treatment uses materials like foam panels, bass traps, and diffusers to control reflections, reduce echo, and create a more balanced sonic environment for recording and mixing.
So, while soundproofing keeps sound in or out, acoustic treatment makes the sound inside sound better. In your home studio, think of soundproofing as the heavy-duty door you might install, while acoustic treatment are the foam panels you strategically place on the walls. Knowing the difference is crucial for setting up your studio properly.
Ultimately, a well-designed studio often incorporates both soundproofing and acoustic treatment for optimal results. You might soundproof to keep the drummer’s thunderous beats from bothering your family, and then use acoustic treatment to ensure the drum recordings themselves sound crisp and clean. It’s a holistic approach to creating a great recording environment.
DIY vs. Professional Acoustic Treatment: Which Route is Right for You?
The DIY route is often tempting, especially if you’re on a tight budget. You might see tutorials online showcasing egg crate foam, moving blankets, or even strategically placed furniture as solutions. And truthfully, some DIY solutions can offer a marginal improvement. Think of it like tuning your own car engine – you might be able to change the oil, but complex repairs are best left to the professionals.
However, the challenge with DIY is that you might not be addressing the specific acoustic issues in your room effectively. Absorption coefficients, diffusion patterns, and proper placement are all factors that require at least some understanding to achieve good results. A haphazard approach could actually worsen the acoustics, leading to a boomy, muddy, or lifeless sound. Imagine spending hours crafting a perfect mix, only to find that it sounds completely different on other speakers.
Professional acoustic treatment involves using scientifically designed products, often installed after a thorough analysis of your studio’s acoustics. Professionals will assess your room’s dimensions, materials, and intended use to recommend the right type, quantity, and placement of acoustic panels, bass traps, and diffusers. This ensures targeted and effective sound control.
The cost of professional acoustic treatment can be significant, but it’s often an investment in the quality of your recordings and your overall workflow. Think of it as hiring a professional chef versus trying to recreate a gourmet meal yourself. The chef has the expertise and tools to deliver a superior outcome. If your livelihood depends on producing high-quality audio, the investment in professional treatment is well worth considering.
Understanding Different Types of Acoustic Treatment
Acoustic panels are probably the most commonly recognized form of treatment. They primarily absorb sound energy, reducing reflections and reverberation. Think of them as sponges for sound. They come in various thicknesses and densities, with thicker panels generally absorbing lower frequencies more effectively. In a typical home studio, you might use acoustic panels to treat first reflection points – the spots on the walls where sound from your speakers bounces directly to your ears.
Bass traps are designed specifically to absorb low-frequency sound, which tends to accumulate in corners and create boomy resonances. These are often the bulkiest type of acoustic treatment, filling up those hard-to-reach corners. Imagine trying to get rid of that low rumble in your car stereo – bass traps do the same thing for your studio. Without them, your mixes might sound thin on other systems.
Diffusers, unlike absorbers, scatter sound energy in different directions. This creates a more spacious and natural sound, preventing flutter echoes and comb filtering. Think of a diffuser as a sound “smoother”. They often have complex, irregular surfaces. You wouldn’t want to put diffusers right next to your speakers, as they would disrupt the direct sound. Instead, they’re typically placed on the back wall or side walls to add ambience and prevent deadening the room.
Another less common, but still important, type is cloud panels. Cloud panels are suspended from the ceiling and are designed to absorb sound reflections from above. They are particularly effective in reducing standing waves and creating a more balanced acoustic environment. If you have a high ceiling, cloud panels are a great option to consider to get you the best acoustic treatment.
Common Acoustic Treatment Mistakes to Avoid
One of the most frequent mistakes is treating only the walls at ear level. While addressing first reflection points is important, neglecting the ceiling and corners can leave significant acoustic issues unresolved. Think of it like painting only the bottom half of a room – the job isn’t truly finished. Low-frequency sounds, in particular, tend to gather in corners, requiring strategically placed bass traps.
Another pitfall is overdamping the room, creating a “dead” or lifeless sound. While reducing reflections is crucial, completely eliminating them can make the recording environment feel unnatural and sterile. It’s like trying to eliminate all imperfections in a photograph – the result can look artificial. The goal is to achieve a balanced acoustic environment with a healthy amount of natural reverberation.
Improper placement of acoustic panels is another common mistake. Simply slapping panels randomly on the walls without considering reflection points or room modes can be ineffective or even detrimental. Imagine hanging artwork without considering the lighting or viewing angle – the effect would be diminished. Use a mirror to identify first reflection points or invest in acoustic measurement software to analyze your room’s response.
Finally, a major mistake is ignoring low frequencies. Many budget-friendly acoustic treatment options focus solely on mid and high frequencies, leaving the bass frequencies untreated. This can result in a boomy, muddy sound that masks other frequencies. Think of it as tuning up the treble on your stereo but ignoring the bass – the sound will be unbalanced. Invest in dedicated bass traps or thicker absorption panels to address low-frequency issues effectively.
Best Recording Studio Acoustical Treatments: A Buyer’s Guide
Hey there, fellow audio enthusiast! Ready to transform your recording space from a sonic nightmare into a professional-sounding haven? Choosing the right acoustical treatments can feel overwhelming, but don’t worry, I’m here to guide you through it. We’ll break down the key factors to consider when selecting the best recording studio acoustical treatments for your needs and budget. Let’s dive in and get your studio sounding amazing!
1. Understanding Your Room’s Acoustics (and Your Goals)
First things first, you need to be a detective! Before you even think about browsing acoustic panels, take some time to analyze your current room. What are its dimensions? What materials are the walls, floor, and ceiling made of? Are there large windows or oddly shaped corners? All of these things significantly impact the way sound behaves in your space. Clapping your hands and listening for echoes is a simple, but effective, start. Is the sound boomy, echoey, or muddy? Knowing these issues helps you choose the appropriate treatment types.
Think about the type of music or audio work you’ll be doing. A voiceover booth requires a different acoustic environment than a space for recording drums. Do you need pinpoint clarity for critical listening, or a more forgiving sound for live instruments? Setting clear goals will help you prioritize the types of treatments you need and prevent you from overspending on things that aren’t necessary. The best recording studio acoustical treatments will always be tailored to the unique challenges and goals of your specific space.
2. Absorption: Taming Reflections and Echoes
Absorption is your primary weapon against unwanted reflections and echoes. Think of it as the acoustic sponge, soaking up sound energy and preventing it from bouncing around the room uncontrollably. Absorption panels are typically made of materials like fiberglass, mineral wool, or acoustic foam, and they work by converting sound energy into heat through friction. This significantly reduces reverberation and creates a clearer, more defined sound.
Different materials and thicknesses absorb different frequencies. Thicker panels generally absorb lower frequencies better than thinner ones. Placement is also crucial. Common locations for absorption panels include the first reflection points (where sound bounces off the walls from your speakers to your ears), side walls, and the ceiling. Strategically placing absorption is one of the most effective ways to improve the acoustics of your recording space.
3. Diffusion: Scattering Sound for a Natural Ambiance
While absorption is great for controlling reflections, too much of it can make a room sound dead and unnatural. That’s where diffusion comes in. Diffusion scatters sound waves in different directions, creating a more spacious and natural-sounding acoustic environment. It helps to break up standing waves and flutter echoes without removing the sound energy from the room.
Diffusers come in various shapes and sizes, with quadratic residue diffusers (QRDs) being a popular choice. These diffusers use wells of varying depths to scatter sound waves in a predictable pattern. Another option is polycylindrical diffusers, which are curved surfaces that scatter sound in a more random fashion. Experimenting with different types of diffusers can dramatically improve the sound of your recording space and finding the best recording studio acoustical treatments may need this important element.
4. Bass Traps: Conquering Low-Frequency Muddiness
Low-frequency sound waves are notoriously difficult to control. They have long wavelengths that easily pass through thinner materials and accumulate in corners, creating muddy and boomy resonances. Bass traps are designed to absorb these low frequencies, preventing them from overpowering the rest of the sound spectrum.
Bass traps are typically placed in the corners of a room, as this is where low-frequency sound waves tend to concentrate. They can be made of thick fiberglass or mineral wool, or they can be specialized designs like Helmholtz resonators. Properly placed bass traps can dramatically improve the clarity and tightness of your low-end, making your mixes sound more balanced and professional. Ignoring this element is a major mistake when pursuing the best recording studio acoustical treatments.
5. Material Matters: Safety, Performance, and Aesthetics
The materials used in acoustic treatments significantly impact their performance, safety, and aesthetics. Fiberglass and mineral wool are highly effective at absorbing sound, but they can also release fibers into the air if not properly encapsulated. Acoustic foam is a more affordable option, but it’s often less effective at absorbing lower frequencies and can degrade over time.
Consider the fire safety rating of the materials you choose. Some materials are more flammable than others, and it’s important to select treatments that meet local fire codes. Also, think about the aesthetics of your studio. Acoustic treatments don’t have to be ugly! Many companies offer panels covered in fabric with various colors and patterns, allowing you to integrate them seamlessly into your studio’s design. The best recording studio acoustical treatments will function well and fit in with your decor.
6. Budget and Prioritization: Smart Spending for Sonic Success
Let’s face it: acoustically treating a studio can be expensive. It’s important to set a realistic budget and prioritize the areas that will have the biggest impact on your sound. Start by addressing the most critical issues, such as first reflection points and low-frequency buildup. You can always add more treatments later as your budget allows.
Don’t be afraid to get creative and explore DIY options. Building your own acoustic panels and bass traps can save you a significant amount of money. However, be sure to research proper construction techniques and use safe materials. Remember, the best recording studio acoustical treatments are the ones that effectively address your room’s specific acoustic problems without breaking the bank.
7. Installation and Placement: The Devil is in the Details
Even the best recording studio acoustical treatments won’t be effective if they’re not installed properly. Take the time to carefully plan the placement of your panels and traps. Use a measuring tape and a level to ensure that everything is aligned and evenly spaced. Improper placement can lead to uneven sound absorption and diffusion, negating the benefits of the treatments.
For heavier panels, consider using wall anchors or other secure mounting hardware. You don’t want your acoustic treatments falling down in the middle of a recording session! Some treatments, like acoustic foam, can be easily attached with adhesive spray or double-sided tape. Always follow the manufacturer’s instructions for installation. With careful planning and execution, you can transform your recording space into a professional-sounding environment.
FAQs
What are the most important acoustic treatments for a home recording studio?
Alright, so when you’re setting up your home studio, the first things you’ll want to tackle are reflection points. These are the spots on your walls where sound waves bounce directly from your speakers to your ears, causing comb filtering and muddying the sound. Bass traps in the corners are crucial for taming those low-frequency rumbles and creating a more balanced sound.
Once you’ve addressed those initial reflections and bass issues, think about diffusion. Diffusion scatters sound waves, preventing flutter echoes and creating a more spacious and natural-sounding environment. You can achieve this with diffusers, bookshelves, or even strategically placed furniture. Getting these three things – absorption at reflection points, bass trapping, and diffusion – will make a massive difference in the clarity and accuracy of your recordings.
How much acoustic treatment do I really need?
That’s a great question, and the honest answer is: it depends! The size and shape of your room play a huge role. A small, square room will likely need more treatment than a larger, irregularly shaped one. The type of music you’re recording also matters; a band recording drums and guitars needs more control than someone recording primarily vocals.
A good starting point is to treat at least 25-50% of your wall and ceiling surfaces. You can gradually add more treatment as you experiment and listen to how your room responds. The key is to avoid over-damping the room, which can make it sound lifeless and unnatural. It’s always better to start with less and add more as needed, listening critically along the way.
What’s the difference between acoustic foam and acoustic panels?
That’s a common question! Both acoustic foam and panels absorb sound, but they do it in slightly different ways and are often made with different materials. Acoustic foam, especially the wedge or pyramid-shaped variety, is generally less dense and effective at absorbing lower frequencies. It’s usually a more budget-friendly option, though.
Acoustic panels, on the other hand, are typically denser and often contain a fiberglass or mineral wool core wrapped in fabric. This construction makes them much more effective at absorbing a wider range of frequencies, including those pesky low-mids that can muddy up your mix. Panels tend to be a little pricier, but offer a better performance overall, especially if you want to treat a broader frequency range or make more serious acoustic improvements.
Can I build my own acoustic panels and bass traps?
Absolutely! DIY acoustic panels and bass traps are a fantastic way to save money and customize your studio. There are tons of tutorials online that walk you through the process, and the materials are relatively inexpensive and readily available at most hardware stores.
The basic construction involves building a wooden frame, filling it with fiberglass or mineral wool insulation, and then wrapping it in fabric. Bass traps are usually larger and placed in corners to effectively absorb low frequencies. Just be sure to wear protective gear like gloves and a mask when handling insulation materials, and do your research to ensure you’re building them safely and effectively.
Are acoustic treatments just for professional studios?
Definitely not! While professional studios are meticulously designed and treated for optimal acoustics, any space where you’re recording or mixing audio can benefit from acoustic treatment. Think about it – even a small bedroom studio can suffer from unwanted reflections, standing waves, and flutter echoes, all of which negatively impact the quality of your recordings.
Acoustic treatments help to tame these acoustic issues, creating a more accurate and pleasant listening environment. Whether you’re a seasoned pro or just starting out, investing in some basic acoustic treatments can drastically improve the quality of your work and help you achieve better results in any space.
Will acoustic treatment make my room soundproof?
This is a common misconception, so let’s clear it up! Acoustic treatment focuses on improving the sound within a room by absorbing reflections and reducing unwanted resonance. Soundproofing, on the other hand, aims to block sound from entering or exiting the room.
While some dense acoustic treatments like thick panels can offer a small amount of sound isolation, they aren’t designed to completely block sound transmission. For soundproofing, you’ll need to focus on things like sealing gaps around doors and windows, using dense building materials, and creating air gaps in your walls and ceiling. So, remember, acoustic treatment enhances sound quality, while soundproofing reduces sound transmission.
What should I look for in a good acoustic treatment brand?
Choosing the right brand for your acoustic treatment can feel a bit overwhelming, but here are a few key things to consider. First, look for brands that provide detailed specifications and performance data for their products, like Noise Reduction Coefficient (NRC) ratings. This helps you understand how effectively the treatment will absorb sound at different frequencies.
Second, check out customer reviews and testimonials. See what other users are saying about the brand’s products and their overall experience. Finally, consider the brand’s reputation for quality and durability. A good brand will use high-quality materials and construction techniques to ensure their products last for years to come, giving you the most bang for your buck.
Final Thoughts
So, there you have it! Armed with the knowledge of the best recording studio acoustical treatments, you’re now one step closer to crafting the sonic sanctuary you’ve always envisioned. Remember, the perfect sound is a journey, not a destination. Experiment, listen intently, and don’t be afraid to tweak things until your space truly sings.
Now, go forth and transform your studio into a space where creativity flourishes and your music truly shines! With the right acoustical treatments in place, the possibilities are endless. Trust your ear, trust your gut, and get ready to unlock the full potential of your recordings. You’ve got this!